

Arduino Thermocouple: A Complete Guide to Temperature Sensing
Introduction
In the world of electronics and embedded systems, accurate temperature sensing is essential—whether you’re designing a 3D printer, a smart oven, or a data-logging weather station. One of the most reliable and widely used sensors for such tasks is the thermocouple, and when integrated with an Arduino, it becomes a powerful tool for both professionals and hobbyists.
In this article, we’ll explore what an Arduino thermocouple is, how it works, and the many practical ways it can be used in your electronics projects. Whether you’re just starting with DIY kits or building industrial prototypes, this guide—brought to you by shop4makers.com—is tailored to help you understand and apply thermocouples with ease.
What Is an Arduino Thermocouple?
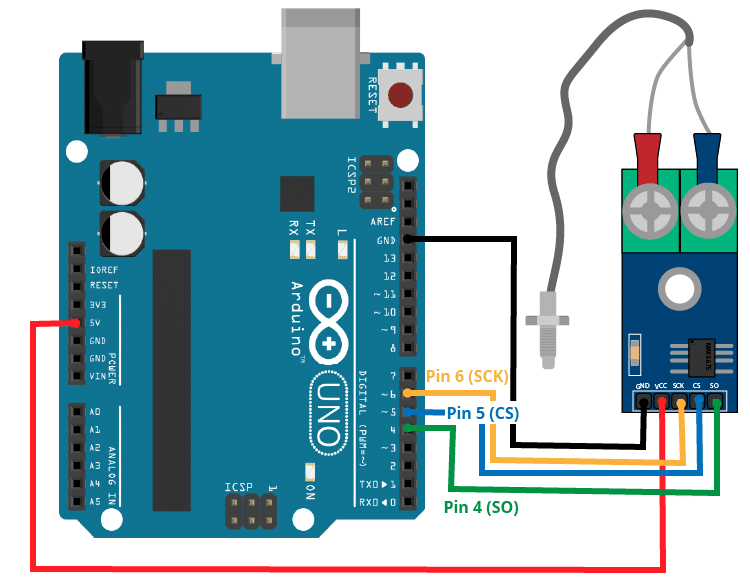
An Arduino thermocouple refers to a setup where a thermocouple sensor is connected to an Arduino board (like UNO, Nano, or Mega) using a thermocouple amplifier module such as MAX6675 or MAX31855. These modules read the very small voltage generated by the thermocouple and convert it into a readable digital signal that the Arduino can interpret.
Key Components:
- Thermocouple sensor (Type K is most common)
- Amplifier module (MAX6675, MAX31855, or others)
- Arduino board
- Jumper wires and breadboard or PCB
Thermocouples are known for their wide temperature range, robustness, and quick response time, making them ideal for environments where standard sensors (like DHT22 or LM35) may fail.
5 Practical Applications of Arduino Thermocouple Modules
1. Industrial Temperature Monitoring
In industrial environments, machines often reach extreme temperatures. By integrating an Arduino thermocouple, engineers can continuously monitor heat levels, detect anomalies, and even trigger alarms or shut down systems in case of overheating.
2. 3D Printers and Heated Beds
Precision in temperature control is critical for 3D printing. Thermocouples help maintain the ideal temperature of extruders and heated beds, ensuring consistent layer adhesion and print quality.
3. Home Automation Projects
Smart ovens, kettles, and HVAC systems can all benefit from an Arduino thermocouple setup. You can create a custom system that automatically adjusts heat based on preset thresholds, making your home more energy-efficient.
4. Scientific Experiments and Data Logging
For science fair projects or professional experiments that require real-time heat tracking, thermocouples offer precise temperature logging capabilities. Using Arduino, you can log data to an SD card or cloud platform and analyze thermal patterns.
5. Environmental Monitoring Stations
From greenhouses to outdoor weather sensors, Arduino thermocouple modules are excellent for monitoring air, soil, or even water temperature. Their wide range and reliability make them a preferred choice in tough conditions.

Advantages of Using Arduino Thermocouples
- Wide Measurement Range: Can measure from -200°C to 1350°C depending on the type.
- High Accuracy and Reliability: Ideal for professional and critical environments.
- Quick Response Time: Detects temperature changes faster than many digital sensors.
- Compatibility with Arduino: Easily integrated using popular modules like MAX6675.
- Cost-Effective: Affordable, especially when bought from platforms like shop4makers.com.
How to Choose the Right Thermocouple for Arduino
When selecting a thermocouple, consider the following:
- Type of Thermocouple: Type K is common, but others like Type J or T are also available.
- Temperature Range: Match it to your project’s requirements.
- Probe Material and Insulation: Stainless steel for harsh environments; Teflon or fiberglass for less exposure.
- Amplifier Module Compatibility: Ensure it’s compatible with your Arduino board.
At shop4makers.com, you’ll find a curated selection of thermocouples and amplifier modules suitable for all project sizes and budgets.
Troubleshooting Common Issues
Even though connecting an Arduino thermocouple is straightforward, you might encounter issues. Here are common problems and solutions:
- No Reading: Double-check the wiring and ensure proper connection to the amplifier module.
- Inaccurate Temperature: Calibrate the sensor and verify code configurations.
- Fluctuating Data: Use shielded cables to prevent electrical noise and interference.
- Wrong Polarity: Thermocouples are polarized. Reverse connections lead to false readings.
Final Thoughts: Why You Should Use Arduino Thermocouples
If your project involves temperature measurement in any form, investing in a thermocouple module with Arduino is a wise decision. With their durability, precision, and wide usability, thermocouples open a whole new world of applications for makers and professionals alike.
At shop4makers.com, we offer a range of Arduino-compatible thermocouple kits and accessories to help you bring your ideas to life.
Don’t just measure temperature—master it.
FAQ: Arduino Thermocouple
Q: Can I use a thermocouple without an amplifier module?
A: No. Thermocouples produce millivolts that are too small for the Arduino to detect directly. You need an amplifier like the MAX6675 or MAX31855.
Q: What is the best Arduino board for thermocouples?
A: Arduino UNO is the most commonly used, but any board with SPI/I2C capability works.
Q: How accurate is a thermocouple with Arduino?
A: Accuracy depends on the module and the environment. Typical accuracy ranges from ±1°C to ±2°C.
Q: Where can I buy a reliable Arduino thermocouple kit?
A: On shop4makers.com, you’ll find tested and reliable modules and sensors at competitive prices.